
Install, First Launch & Updates
Welcome to DreamCreator. This document walks you through downloading, installing, initializing, using, and updating DreamCreator.
Download & Install
Download and install
You can download the latest installer directly. Older versions are available on GitHub Releases.
| Platform | Architecture | Format | Download |
|---|---|---|---|
| macOS | Apple Silicon | Archive | Download |
| macOS | Intel | Archive | Download |
| Windows | x64 | Installer | Download |
| Windows | x64 | Portable | Download |
If you are not sure which package to choose, use this quick guide:
macOS Apple Silicon: forM1 / M2 / M3 / M4and other Apple Silicon Macs. Choose thearm64archive.macOS Intel: for Intel-based Macs. Choose thex64archive.Windows Installer: better for a machine where DreamCreator will stay installed long term.Windows Portable: better for temporary environments, removable storage, or machines where installation is not ideal.
First launch
-
macOS: unzip the archive and moveDreamCreator.appto Applications. If Gatekeeper says the app cannot be opened or is damaged, control-click and choose Open, or run:sudo xattr -rd com.apple.quarantine /Applications/DreamCreator.app -
Windows: run the.exeinstaller directly, or unzip the portable archive and launch it. If SmartScreen appears, chooseMore info -> Run anyway.
Welcome
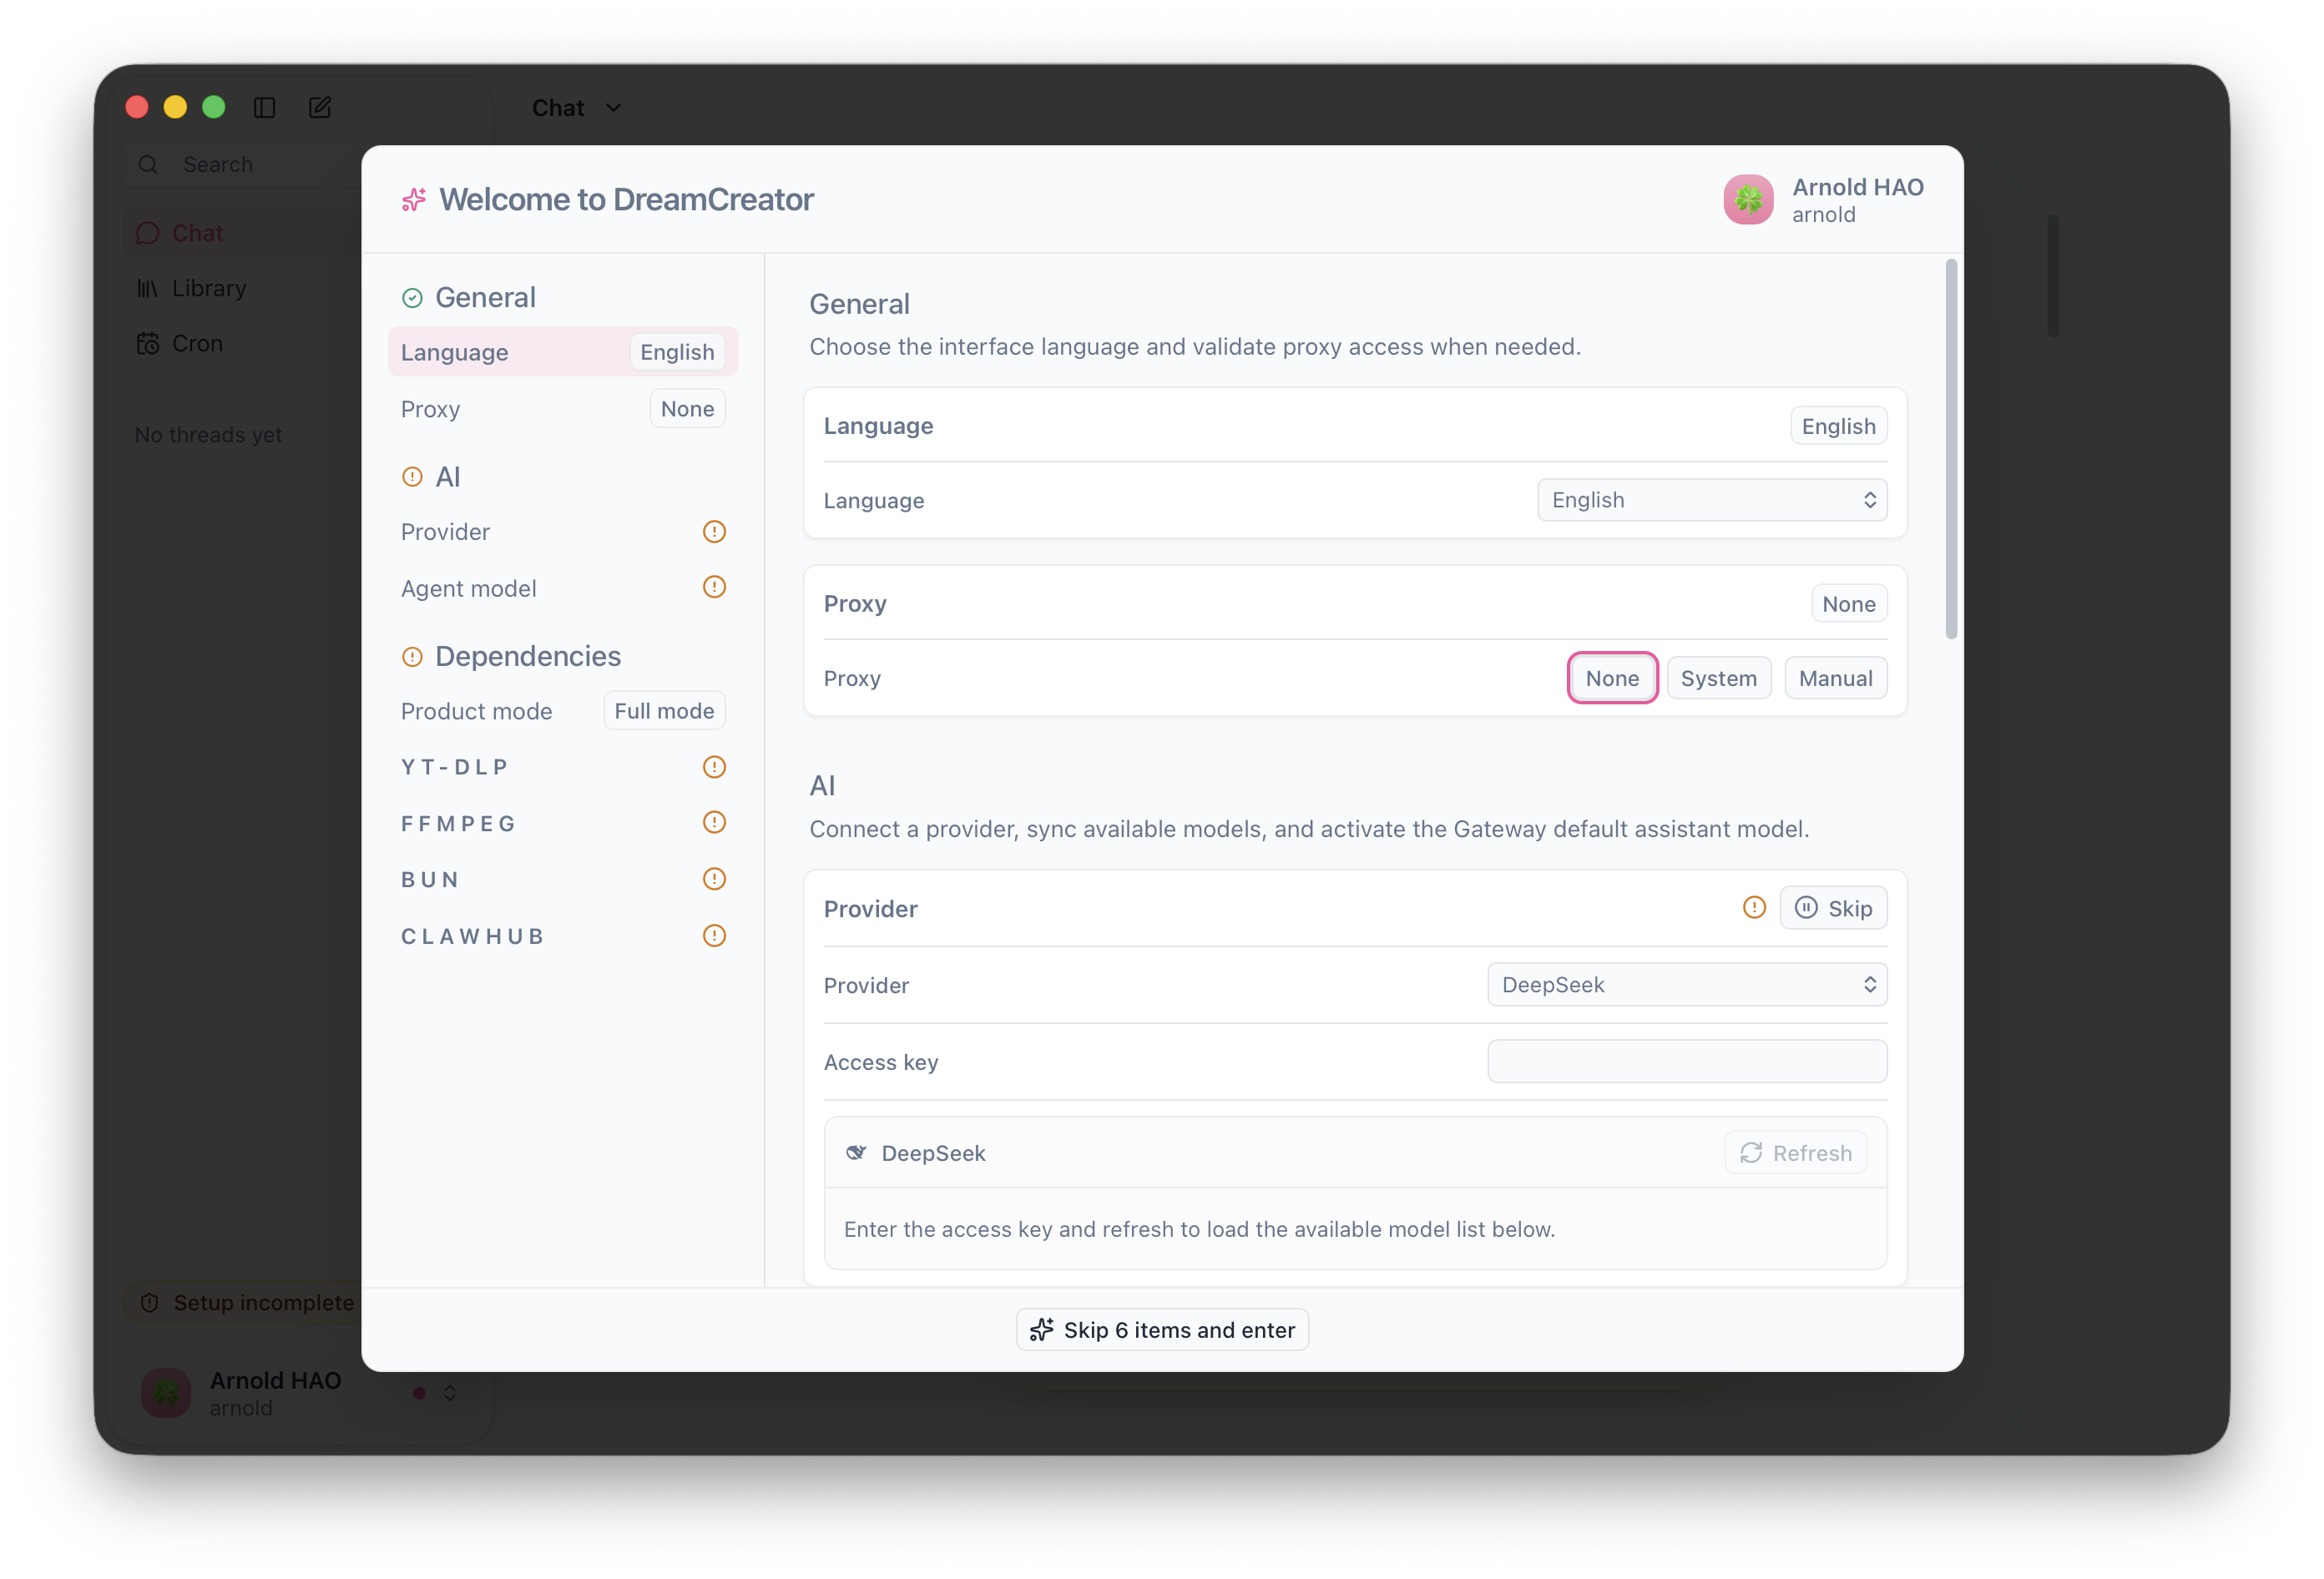
The first time you open DreamCreator, an onboarding page appears automatically and walks you through initialization. The left side lists the items that still need configuration, and the right side shows the settings for the currently selected item. The default language is English, but you can change Language on this page immediately. The app currently supports English and Chinese.
Enter directly
You can also use the button at the bottom of the onboarding page to skip all six setup items and enter the app immediately. That closes the onboarding page and marks the remaining initialization items as skipped for now.
- If any initialization items are still incomplete, the app keeps a reminder button in the lower-left corner so you can reopen the onboarding page.
- You can also finish AI and dependency setup later from Preferences. The onboarding page checks these states automatically; once everything has been initialized, that reminder goes away on its own.
Onboarding setup
General
General settings cover language and proxy. The defaults are English and no proxy; if your environment does not need changes here, you can move directly to the AI section.
- Language: DreamCreator currently supports
EnglishandSimplified Chinese, and the interface switches immediately after selection. Later, you can change it again inPreferences -> General. - Proxy: if you work in a restricted or unusual network environment, you can use a proxy here. DreamCreator currently supports system proxy and manual proxy. System proxy automatically detects the current environment and shows the proxy address and status when available. Manual proxy supports common protocols, so you can choose the option that fits your network. Later, you can change this in
Preferences -> General.
AI
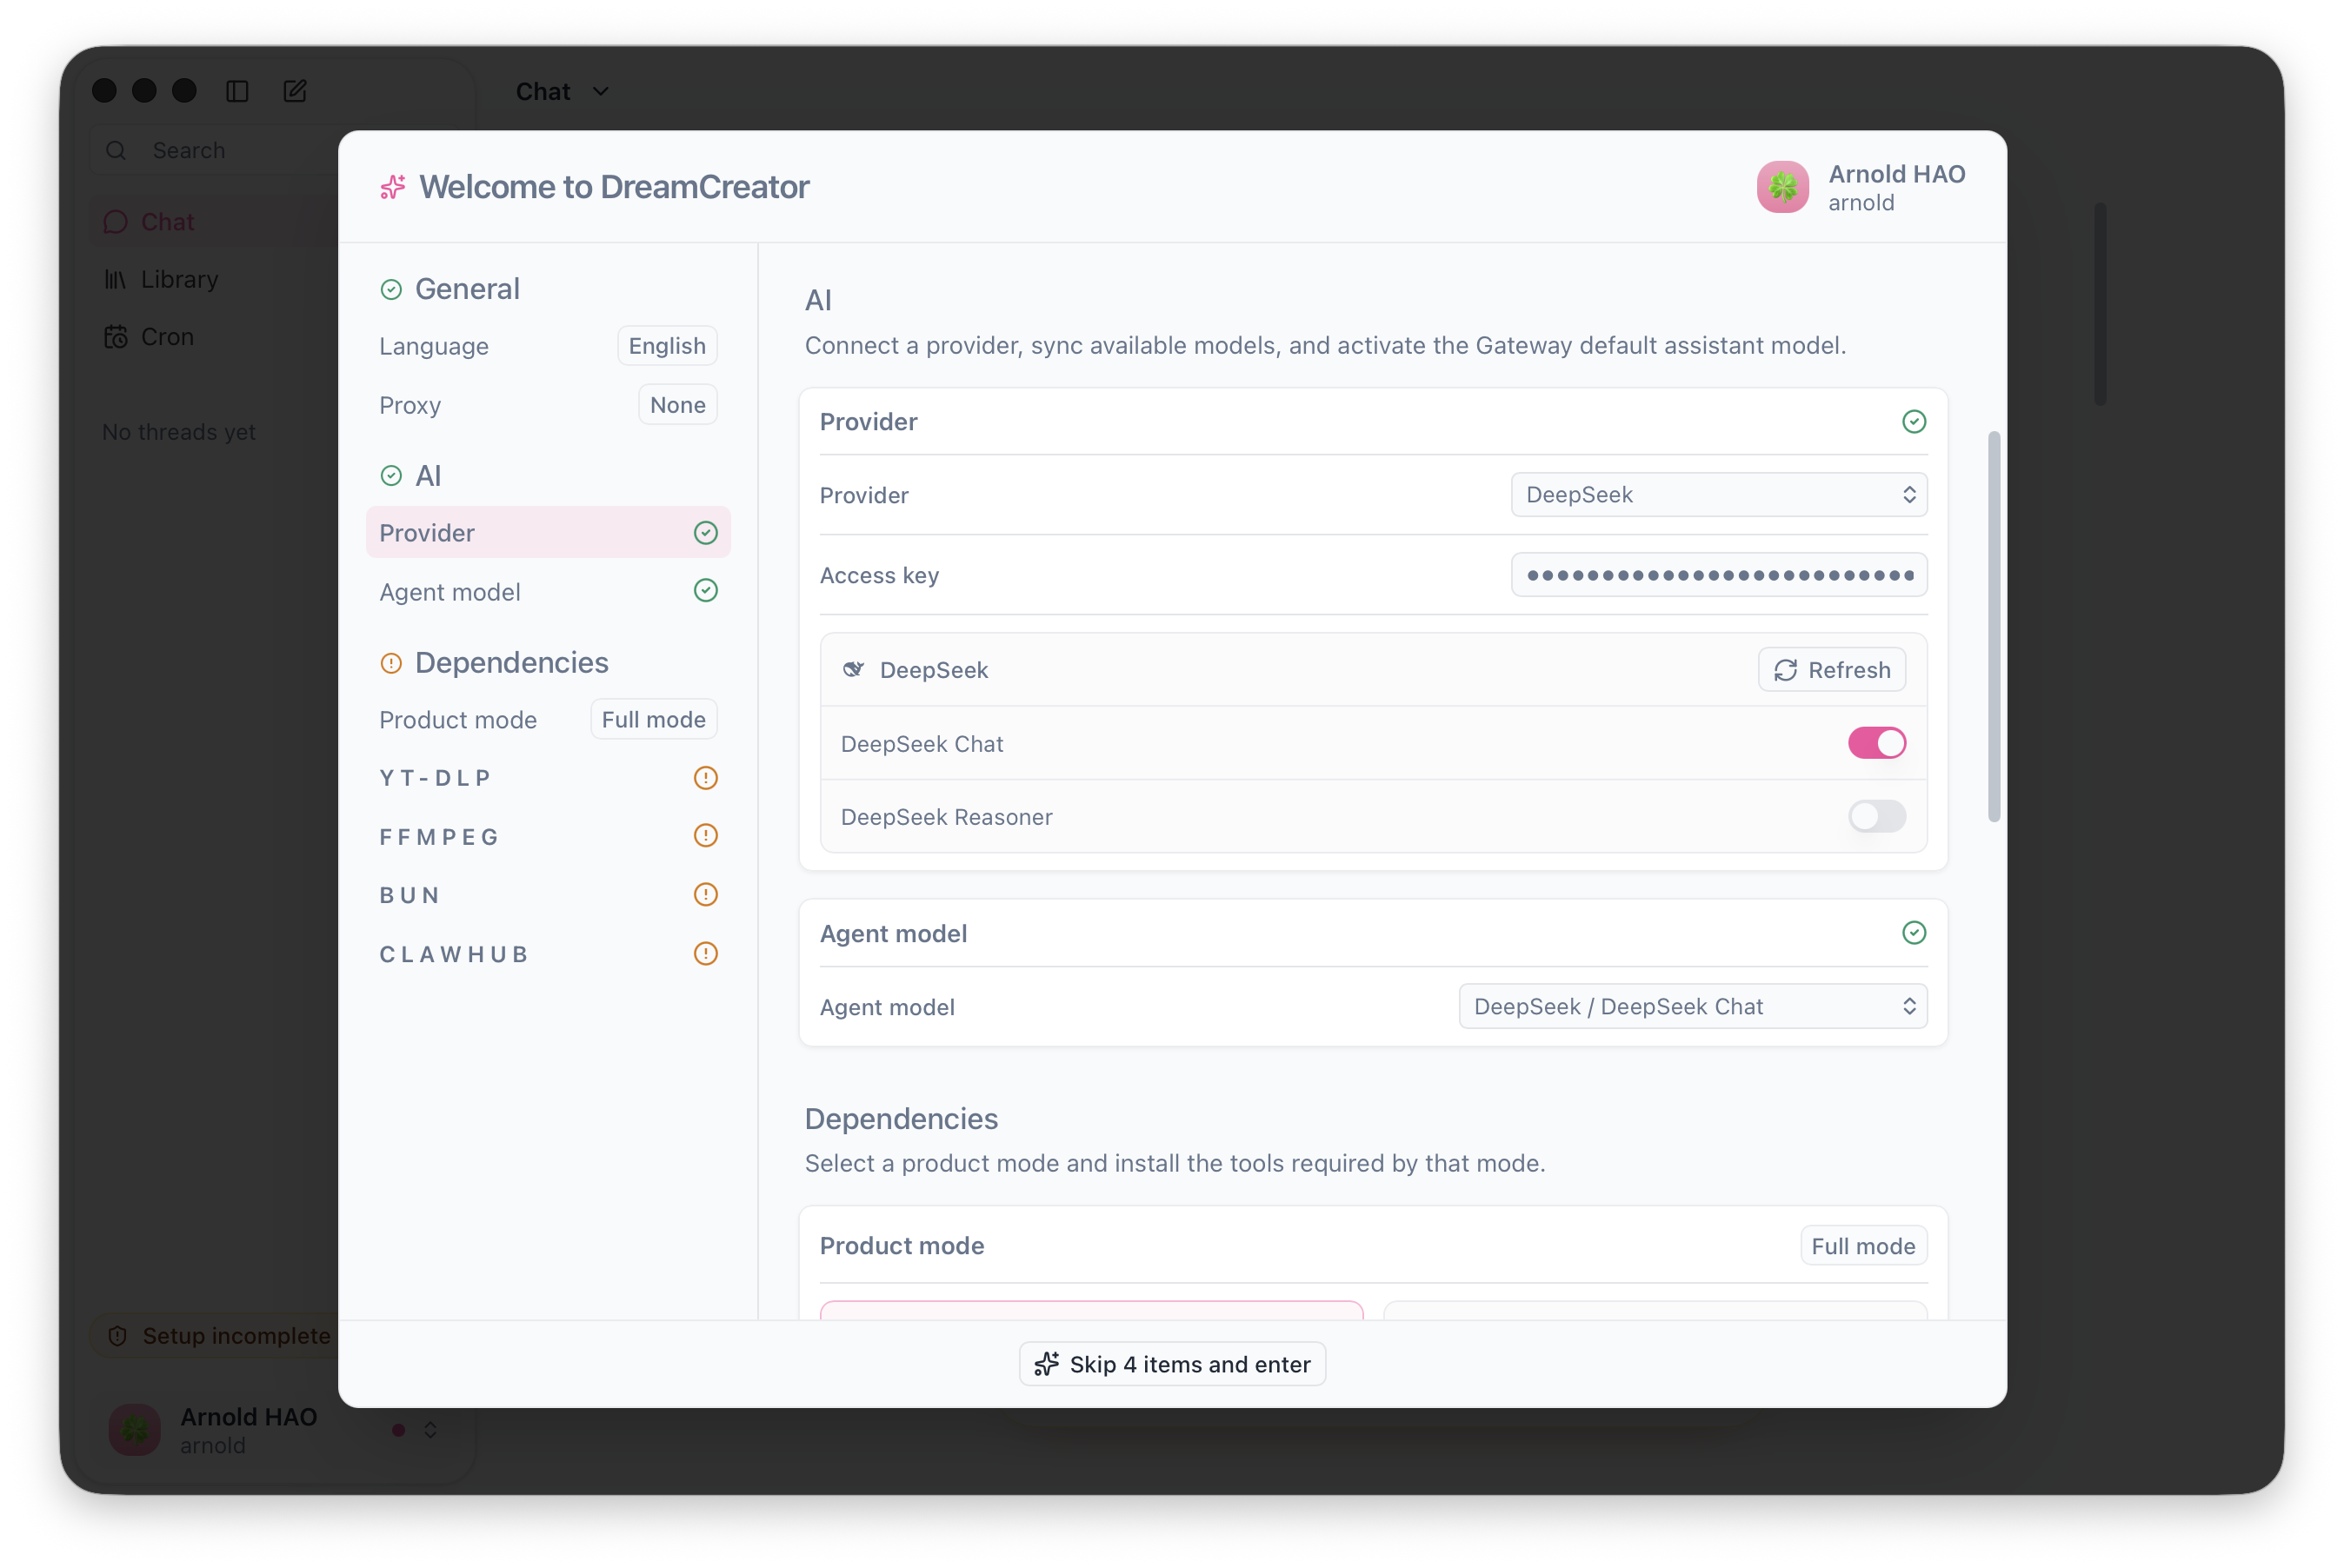
Subtitle translation and assistant conversations both depend on AI. In the onboarding flow, there are two AI items to configure: provider and assistant model. Each item can be skipped from the top-right corner and completed later in Preferences.
- Provider: choose a provider, enter the access key, and click refresh. If the network path and key are valid, DreamCreator will return the models currently available under that provider. You can then enable the models you actually want to use. Later, this can be managed in
Preferences -> Provider. - Assistant model: once at least one model is enabled under a provider, DreamCreator will automatically select an available model for the assistant. You can also choose one manually as the default model for assistants, translation, and similar flows. Later, this can be changed in
Preferences -> Gateway -> Assistant -> Parameters -> Model -> Assistant Model.
Dependencies
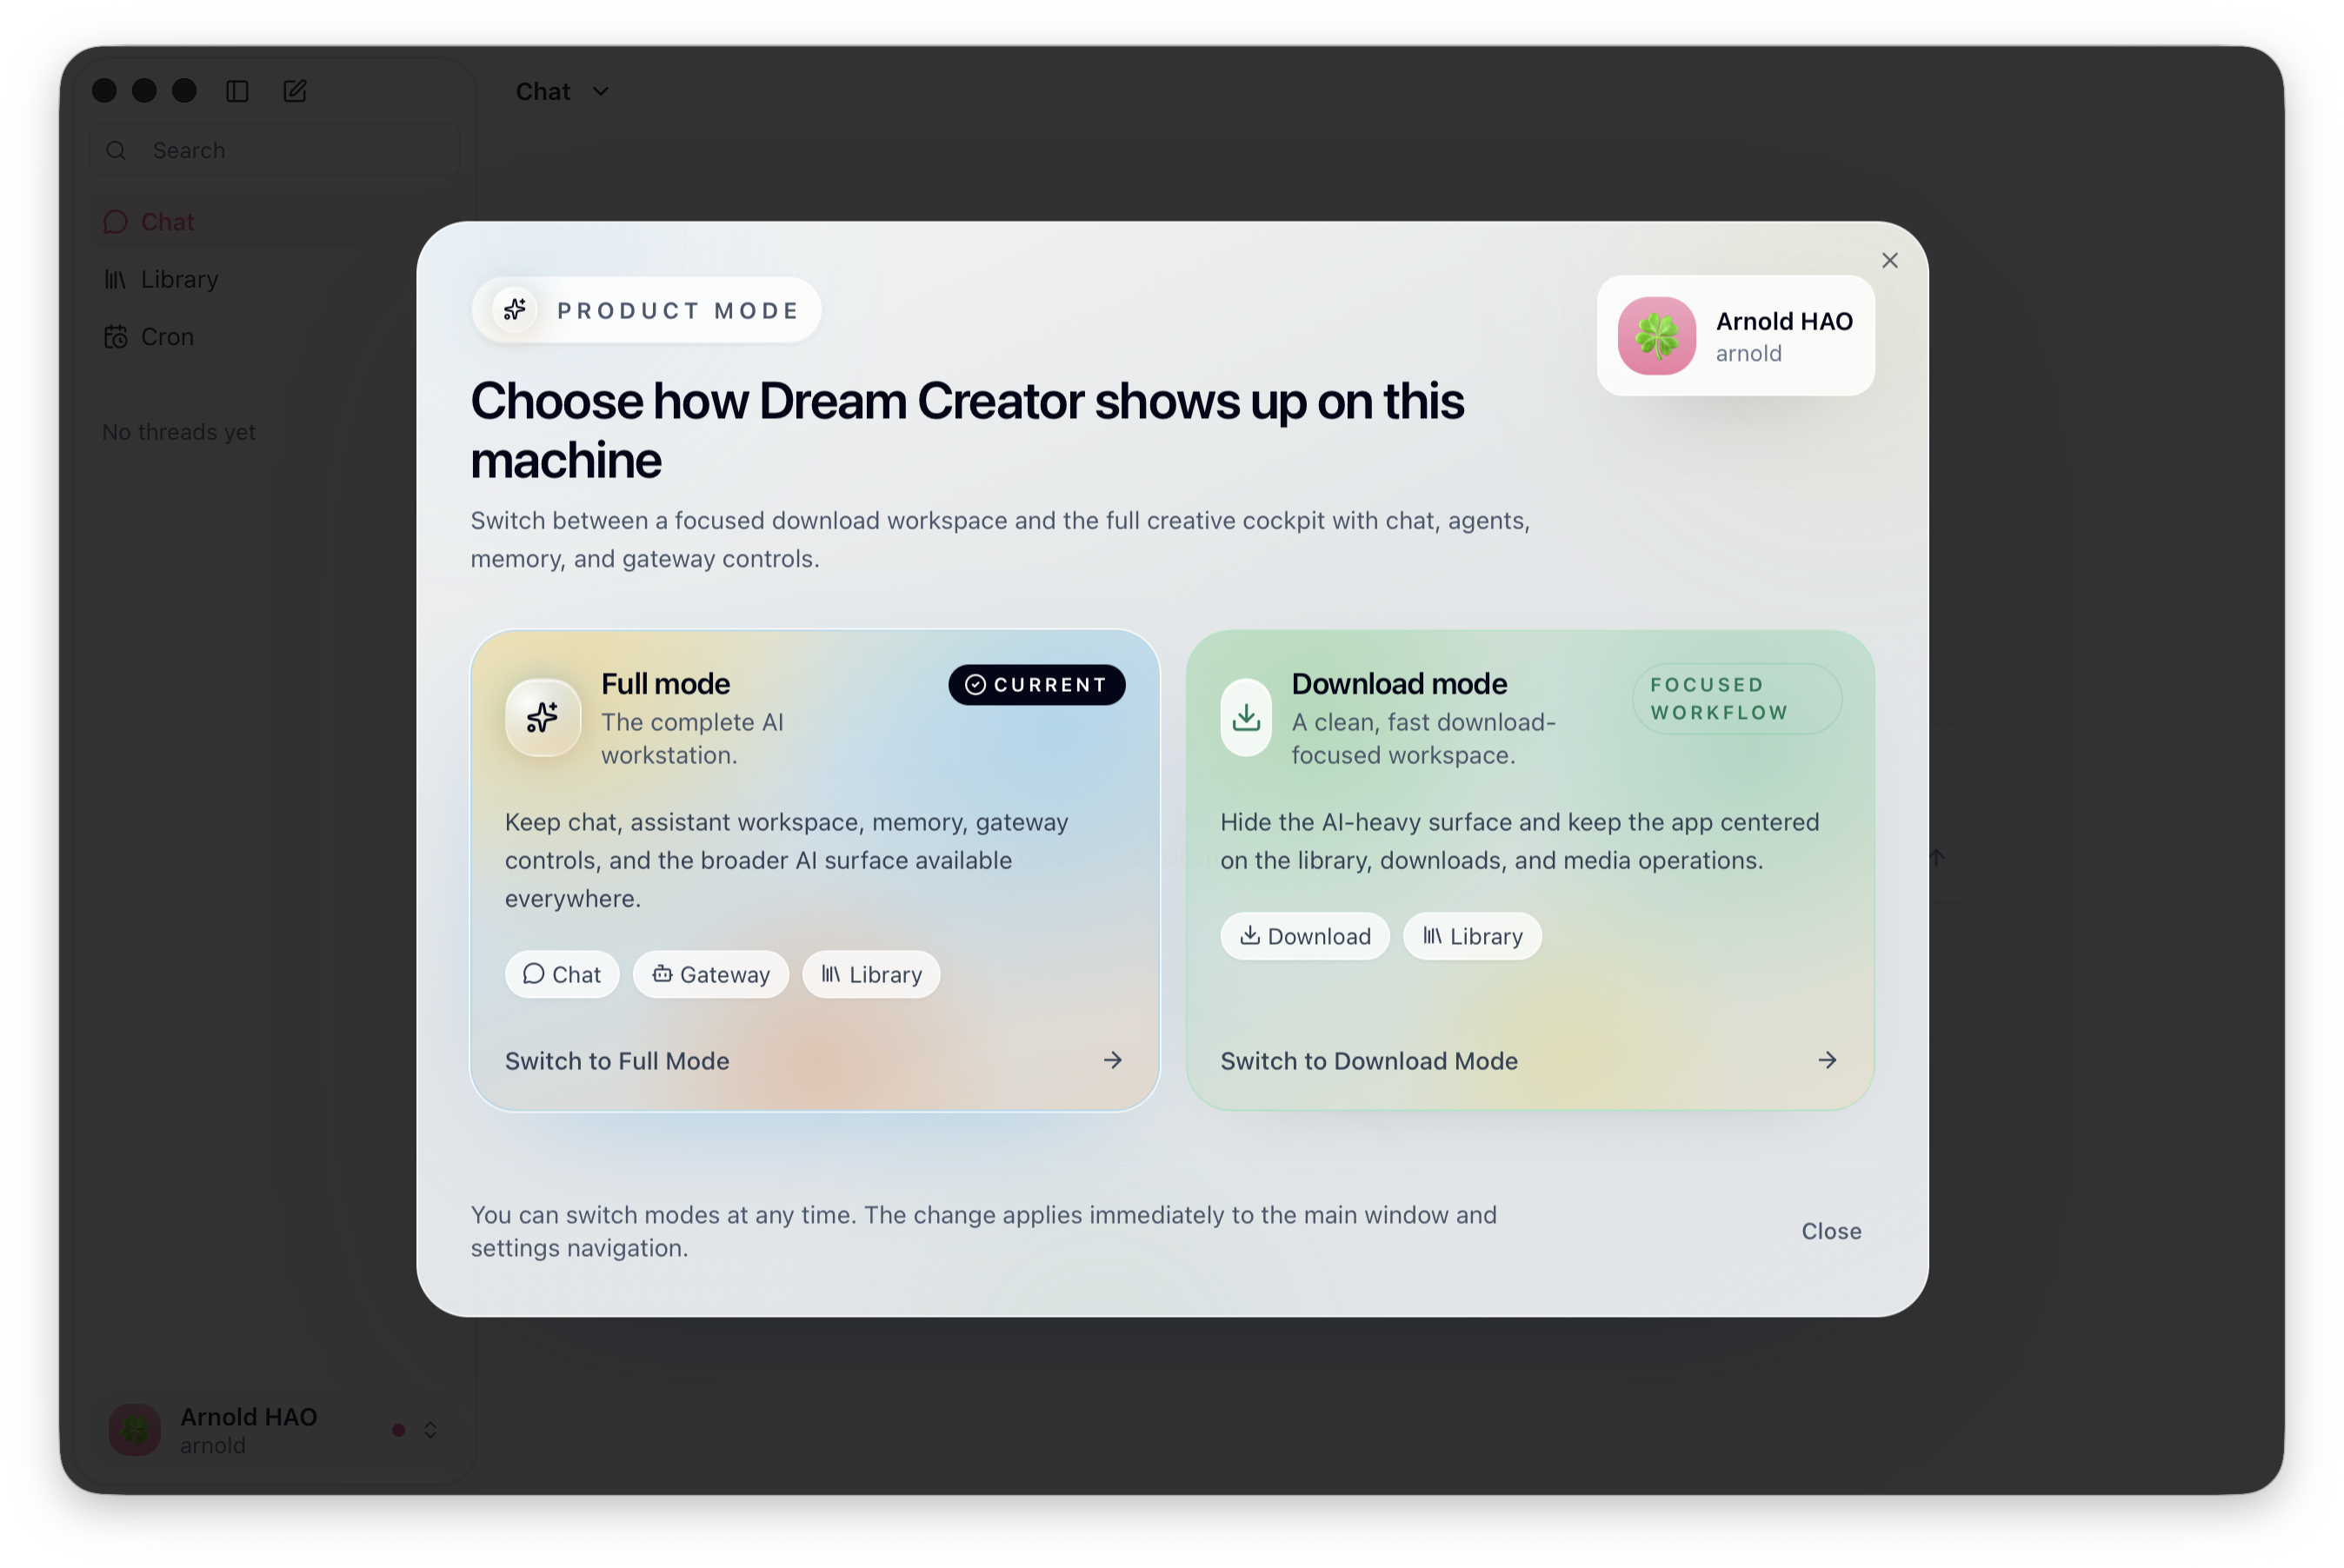
In the dependency step, you can first choose the product mode you want to use. Different product modes require different dependencies.
- Product mode: DreamCreator currently supports a full mode and a download mode. If you only want to use the app as a downloader, you can switch to download mode. In that mode,
CLAWHUBis not required, and UI elements unrelated to download and translation are hidden. If you want chat, scheduled tasks, and the full capability surface, keep the default full mode. Later, you can switch it from the user info area in the lower-left corner underProduct Mode.
YTDLP(yt-dlp) /FFMPEG(FFmpeg) /BUN/CLAWHUB: you can chooseInstallorSkipfor each dependency.YTDLP,FFMPEG, andBUNare baseline dependencies for download features; without them, download workflows will not work correctly.CLAWHUBis the local runtime dependency used by the Skills online source in full mode; without it, chat and other full assistant capabilities are unavailable. Later, these items can be managed inPreferences -> Integration -> External Tools.
The dependency installer uses gh-proxy for acceleration, but successful download still depends on your network environment. If the network path is complex, configure proxy first and then come back to dependency installation.
After all six initialization items are complete, use the button at the bottom of the page to enter DreamCreator and start using it.
How to use it
DreamCreator is built for content creators and provides a wide range of capabilities around content creation. Continue with the document for the capability you care about most.
- Video Download: based on
YTDLP, this guide explains how to download online video into the local library for management. - Subtitle Proofreading & Translation: see how to continue from existing subtitles for proofreading, translation, QA, and export inside one workspace.
- Video Transcoding & Subtitle Burn-In: see how to connect video, subtitles, styles, and export settings into the final processing flow before delivery.
- Conversation, Research & Idea Organization: see how to let the assistant participate in research, idea organization, structuring, and follow-up execution.
- Scheduled Tasks: see how to hand recurring download, organization, reminder, and trigger work to scheduled jobs that keep running.
- Mobile Channel Access: see how to connect Telegram so the same assistant can continue following tasks away from the desktop.
Use cases
Beyond individual capabilities, we also provide a few scenarios that fit DreamCreator especially well. If you have needs in these areas, these pages show how DreamCreator can help you work more efficiently.
Software updates
DreamCreator automatically tracks version changes for both the app itself and its external tools. When an update is available, a small dot appears on the user info area in the lower-left corner. Open the user info menu and you can jump directly to the page that needs updating.
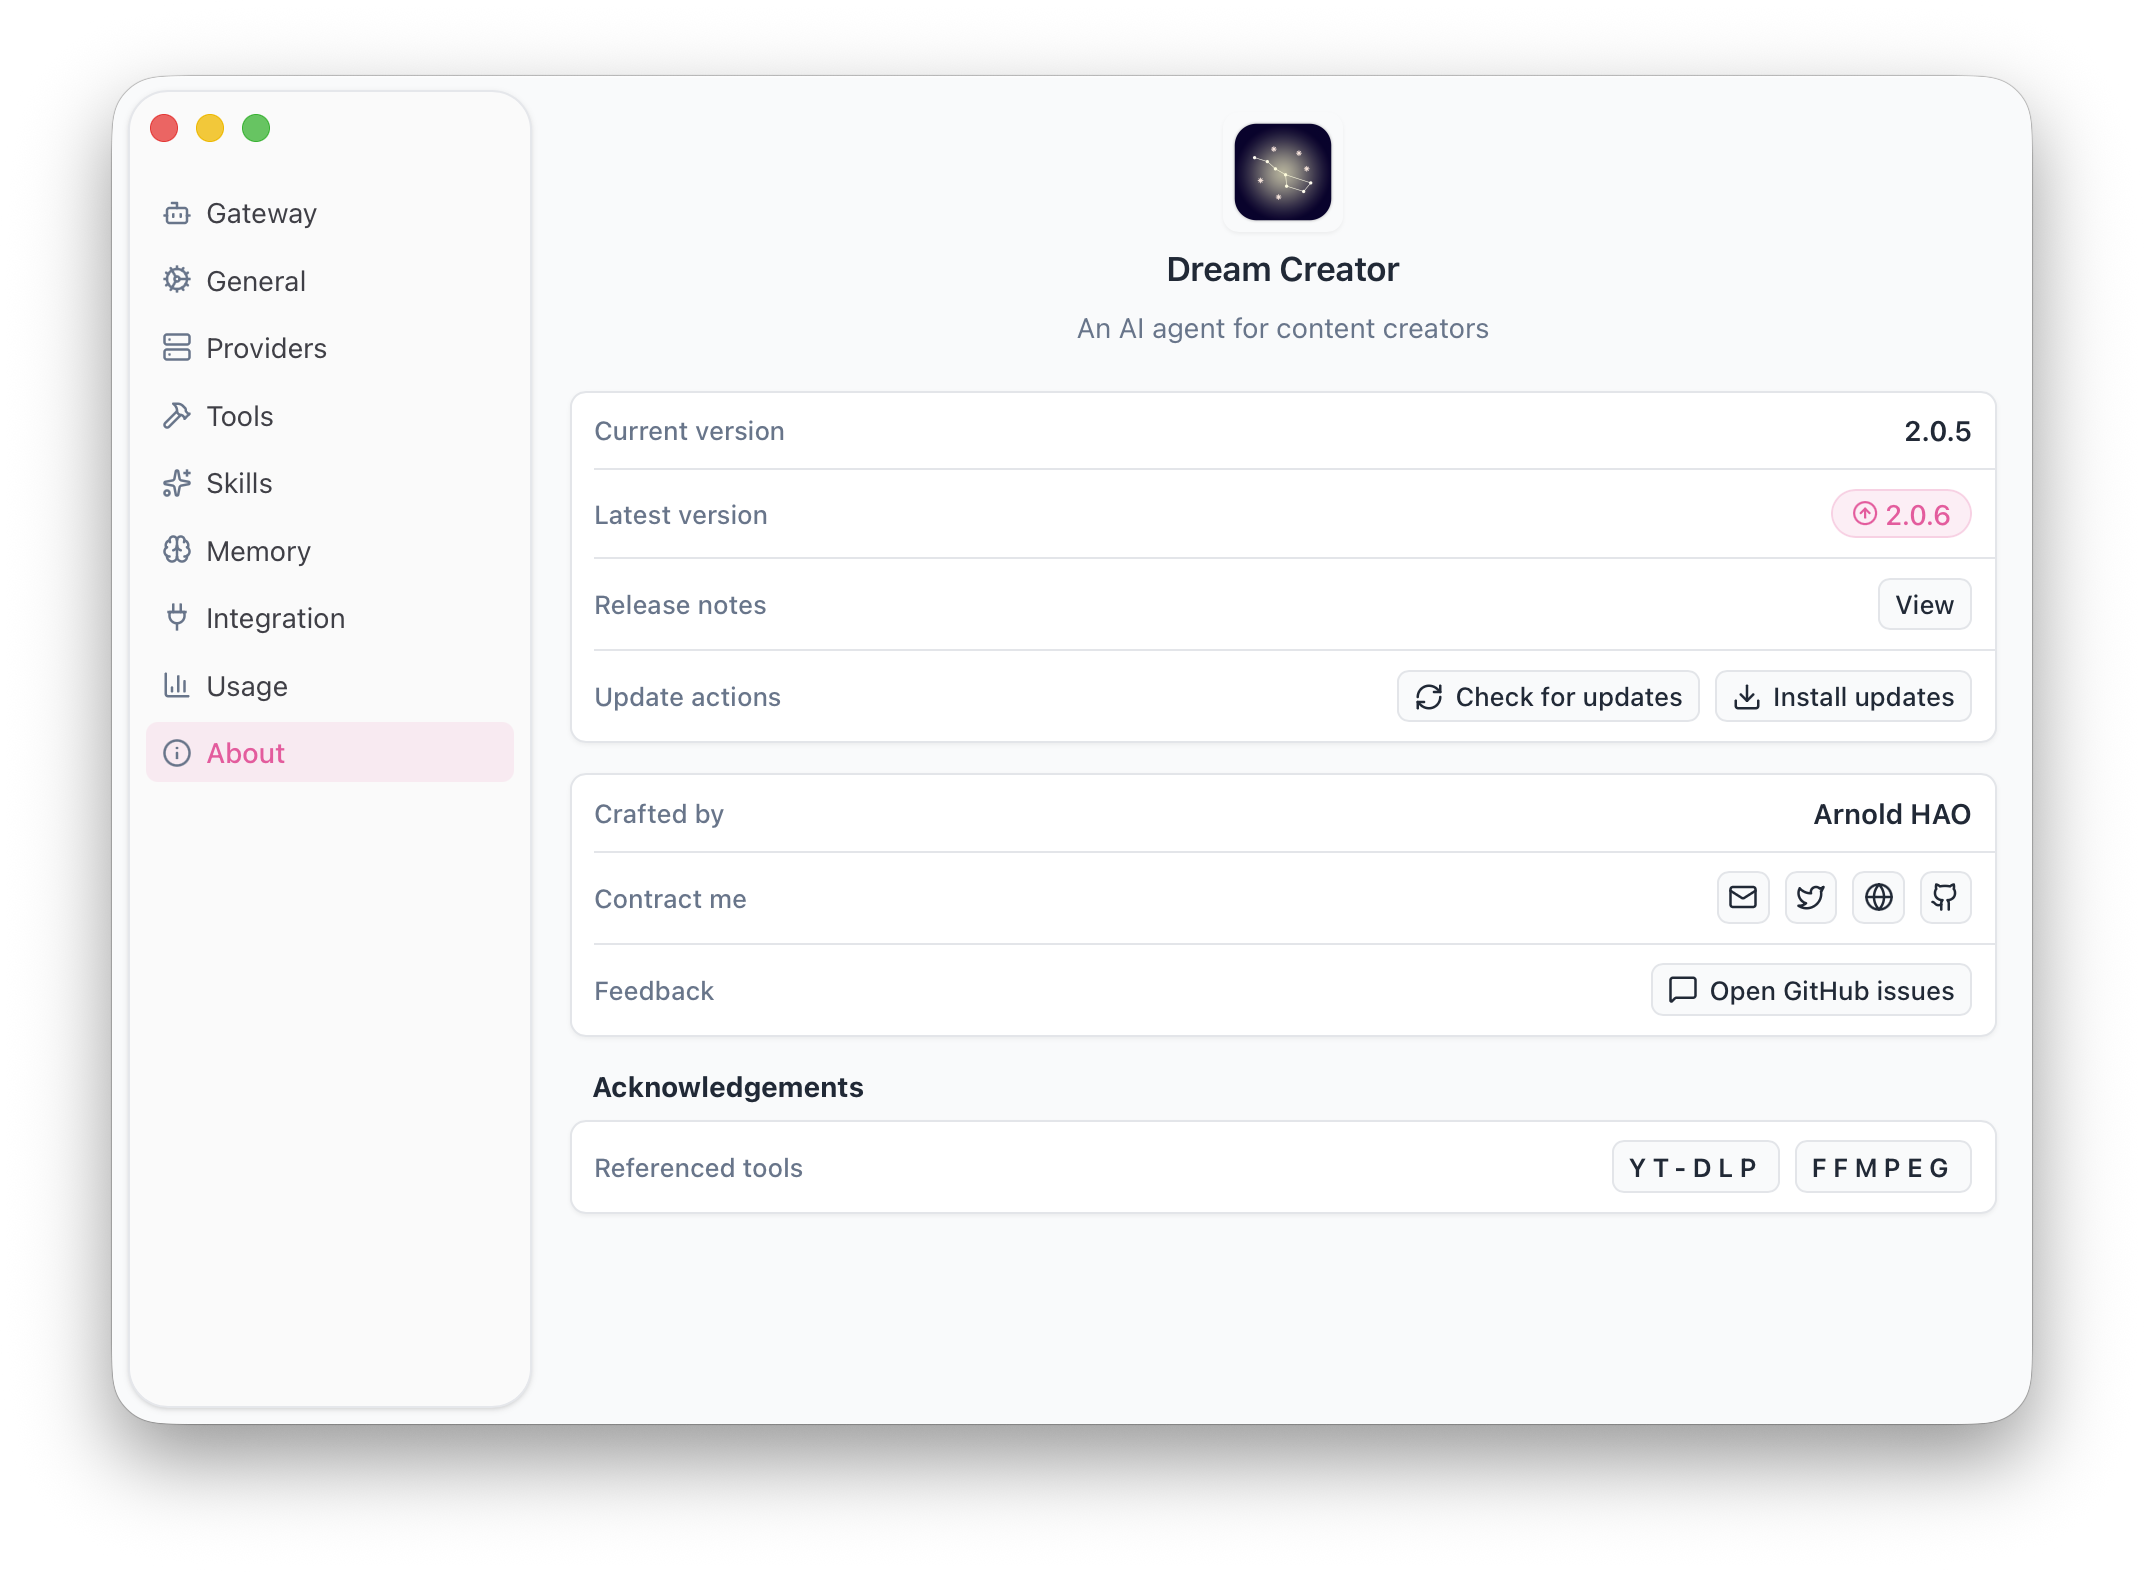
- App updates: you can jump there from the update entry in the user info menu, or open the page through
Preferences -> About. The page shows both the current version and the latest version. You can also clickCheck for Updatesto confirm manually whether a new version is available. TheViewlink next to the changelog lets you inspect the latest update details. If a new version is available, clickInstall Updateand DreamCreator will download it automatically. After the download finishes, clickRestart to Apply; the app will complete the update and reopen itself. OnWindows, you also need to confirm the SmartScreen dialog, otherwise the update will not finish. - External tool updates: you can also jump there from the update entry in the user info menu, or open
Preferences -> Integration -> External Tools. If a dependency has an update available, the page will show a version prompt. ClickUpdateand follow the guided steps to complete the update.